User Profiles
How to guides related to user profiles
What is User Profile
The user profiles contain information about your end-users such as name, email, addresses, and their unique identifier. You can manage the profiles via the Portal & Admin API. The end-users can also manage their own profile through the Profile section in the User Setting page provided by the AuthUI.
The complete information in the user profiles is a combination of standard attributes and custom attributes. Attributes are a way of grouping the fields of the user profile information. With standard attributes containing common fields, you'll find in a user profile, hence the names of these fields are set by Authgear. You set custom fields on the other hand based on the unique needs of your project.
Standard Attributes
The following attributes are built-in supported by Authgear. They are the set of Standard Claims defined by the OIDC specifications. Some of them are default hidden from the Admin Portal and end-users. Their visibility and mutability can be configured through the Admin Portal.
Name
Hidden
String
Given Name
Editable
String
Family Name
Editable
String
Middle Name
Hidden
String
Nickname
Hidden
String
Profile
Hidden
URL String
Picture
Editable
URL String
Website
Hidden
URL String
Gender
Editable
male, female or Custom String
Birthdate
Editable
Date in YYYY-MM-DD
Language
Editable
BCP47 language tag enabled by the project
Address
Hidden
JSON Object
Standard Attributes that are coupled with Identities
The following attributes are coupled with the identities owned by the end-user. They represent the email addresses, phone numbers, or usernames the end-users are using to authenticate themselves on Authgear. If the end-user uses a third-party identity provider for authentication, these attributes will be coupled with the corresponding attributes returned by the provider.
The standard attributes coupled with identities are listed below:
emailemail_verifiedphone_numberphone_number_verifiedpreferred_username
The above attributes are coupled with identities when a user specifies them during sign-up, when users verify their email address or phone number, or from User Management > Users > select a user > Identities in Authgear portal or via the Admin API.
The Login Methods enabled for an Authgear project affect the identities available.
Custom Attributes
You can define a set of custom attributes in the user profile. They are returned as a JSON object in under the custom_attributes key in userInfo.
Add new custom attributes
Go to Portal > User Profile > Custom Attributes and click Add New Attribute
The custom attribute name should consist of lowercase letters (a-z), digits (0-9) and underscore (_) only. It must start with lowercase letters (a-z), and NOT end with an underscore (_). The default display name will be the attribute name split with underscore and in title case. e.g. my_string will render as My String in the AuthUI Settings page.
Authgear supports the following attribute types:
String
Number
Integer
Dropdown
Phone Number
Email Address
URL
Country Code
Modify custom attributes
You can change a custom attribute name and validation settings such as min and max value. The attribute type cannot be changed once it's set. To migrate the attribute into a new type, create a new attribute, migrate the values from the old to the new one, and then change the name and access right of the old attribute to make it obsolete.
Delete custom attributes
Deleting custom attributes is not supported. You can change the name and access rights to make an attribute obsolete.
Custom attribute order
You can arrange the attribute order by drag-and-drop the handle in the custom attribute configuration in the Portal. This will control the order of how the attributes are shown to the end-users in the AuthUI User Settings page.
User Profile Configuration
The access rights for different parties on individual attributes can be configured through the Authgear Portal. Under the hood, all the attributes are available, however, they can be configured to be hidden or read-only according to the needs of your projects to avoid confusion.
These are the parties that have access to the user profile:
The Admin API
Through the Admin API, developers ALWAYS have full access to ALL the standard attributes and custom attributes. The Admin API allows the developer to view or edit the standard attributes and the custom attributes.
The Portal
The admin user can view or edit the standard attributes via the Authgear Portal.
The Session Bearer
The session bearer is someone who has a valid session cookie or a valid access token. The standard attributes of the end-user whom the session represents can be viewed by accessing the UserInfo endpoint and the resolver endpoint. The session bearer can be the end-user, the client mobile app, or the client website.
The End-user
The end-user can view or edit the standard attributes through the Profile section in the User Setting page provided by the AuthUI.
Profiles from Third-party Identity Providers
Authgear supports various social and enterprise identity providers. End-users can sign up and log in to your apps via these connections. Upon signup, these providers will return a set of user attributes about the end-user. Authgear will copy those attributes and populate the profile of the end-user.
More info about the population logic can be found in the specification.
Access User Profiles
Learn how to access User Profiles
To access any of the applications in your Authgear account, each user must have a profile in the account. User Profiles contain information about your users such as name, contact information, and standard and custom attributes you define. You can retrieve and manage user profiles in the following ways:
User Profiles Access Right
Access Right defines what information can be viewed or modified when a user's profile is accessed via the Authgear Portal, User Info endpoint, or User Settings page.
An Access Right can be set for each profile attribute under a specific medium of accessing user profiles. For example, in the following screenshot, the Primary Email attribute has the Editable Access Right for Portal, Read-only for User Info endpoint (also known as access Token Bearer), and Editable for User Settings page. In simpler terms, the example means an admin can modify Primary Email in Authgear Portal, while a client application can use a user's access token to view their Primary Email. Finally, users can edit their own Primary Email from the User Settings page.

Access Right Options
The following are the available Access Right options that can be applied to each attribute for a specific medium.
Editable: Grants a medium access to view and modify the value of an attribute.
Read-only: A medium with this access for an attribute can only view the value of the attribute.
Hidden: If the access for an attribute is set to
Hiddenfor a medium, that medium can not view or modify the attribute.
By default, Authgear sets different access rights for the standard attributes on each way of accessing user profiles. You can view and configure this default access right from User Profile > Standard Attributes in the Authgear Portal.
For Custom Attributes, you can define the access right for each way of accessing a user profile from User Profile > Custom Attributes in the portal.
Each way of accessing user profiles belongs to one of the following Access Right Categories:
Portal Admin Access Right: Use this category to set the access right of an attribute in the Authgear Portal for an admin user.
Token Bearer Access Right: This sets the access right of an attribute for the User Info endpoint when a token bearer accesses it. It can be "Hidden" or "Read-Only".
End-user Access Right: Use this to set the access right of the attribute for the default User Settings UI when accessed by an end-user.
How to Retrieve and Manage User Profiles
Prerequisites
An Authgear account: You need an Authgear account to follow this guide. If you don't have one, you can create it for free on the Authgear website.
A Registered App: You need a registered application (client) in Authgear.
1. Access user profiles from the Authgear UI portal
It is the fastest and easiest way to view user profiles and manage them.
Expand this to see the guide
To view see user profile of a specific user:
Go to the Authgear Portal.
Navigate to User Management.
Choose a user you would like to view a profile.
On the User Details page, you will see the Profile tab.

To manage access for standard attributes for all users:
Go to Portal > User Profile > Standard Attributes

To manage access and add new custom attributes for all users:
Go to Portal > User Profile > Custom Attributes and click Add New Attribute

2. Access user profiles from apps using Authgear SDKs
Once Authgear completes authentication and returns control to your application, it provides the user profile to the application. Most developers prefer to use the Authgear SDKs to get the UserInfo object using the fetch user info function. To start using this function read getting started guides relevant to the SDK of your choice. Here are some code snippets that call the fetch user info function for different Authgear SDKs:
3. Access user profiles from Admin API
Authgear provides an Admin API GraphQL endpoint that allows applications and services to access and manipulate the User Profile object. The API Explorer lets users interactively explore the Admin API. With the API Explorer, you can search for users' profiles or update their standard or custom attributes. See the example steps of how to achieve this below:
Expand this to see the guide
Go to the Portal.
Navigate to the Advanced -> Admin API.
Find a section called GraphiQL Explorer.
Click on the GraphiQL tool link.

The explorer will be opened in a separate browser tab.

Search for a user by
emailand put in your querystandardAttributesandcustomAttributes. For example:
4. Access user profiles from the OIDC UserInfo endpoint
The OpenID Connect (OIDC) UseInfo endpoint is a protected resource that provides information about a user when a service provider presents an access token that has been issued by your Authgear Token endpoint. The scopes in the access token specify the user attributes that are returned in the response of the user info endpoint. It is important to note that the openid scope must be one of the access token claims.
UserInfo Endpoint
Th e UserInfo endpoint returns the Claims about the authenticated end-user, including the standard profile and custom attributes.
The userInfo object is returned from calling fetch user info function which contains a unique identifier of the user.
The following are some attributes that are usually in the userInfo object. Other attributes like email, phoneNumber and custom attributes will be in the userInfo object if those attributes were set for the current user.
isVerified
boolean
Indicate if the user completed the verification requirement
sub
string
Unique identifier of the user in your Authgear project
To access a user's profile using the UserInfo endpoint of OpenID Connect, you need to follow these steps:
Expand this to see the guide
To access a user profile endpoint, you need to have a JWT access token in the header of a request to /oauth2/userinfo
We are going to use cURL commands in our API calls or you can also use Postman or similar tools.
Prerequisites
Make sure that you have a registered app type of OIDC Client Application in Authgear Portal.
You have successfully configured your application to use Authgear as an OIDC provider. See your getting started guide for detailed steps.
Step 1: Obtain an access token
Your client application needs a valid access token for a user in order to make request to the UserInfo endpoint.
To get an access token, you need to make a request to the OpenID App's Token endpoint to exchange the authorization code that was retrieved after authorization for an access token.
The token endpoint URL is usually something like
https://<YOUR_AUTHGEAR_ENDPOINT>/oauth2/token.Include parameters such as
grant_type=authorization_code,code=AUTHORIZATION_CODE,client_id=YOUR_CLIENT_ID,client_secret=YOUR_CLIENT_SECRET, andredirect_uri=YOUR_REDIRECT_URI.Make a POST request to the token endpoint to obtain the access token.
The following is an example of a request to the token endpoint sent for a terminal using cURL:
Step 2: Make a request to the Userinfo endpoint
Once you have obtained a JWT access token, you can use it to make a request to the Userinfo endpoint. The request to the Userinfo endpoint should include the access token in the Authorization header using the Bearer scheme.
If you are using Postman, you can enable the Authorization type of OAuth2.0, provide the necessary information for getting the authorization code, obtaining an access token and use that token to request the Userinfo endpoint:

See a detailed explanation of the structure and fields included in the response of the UserInfo endpoint here.
5. Embed User Profiles into the JWT Access Token
Authgear WebHooks makes it possible to embed the standard attributes and custom attributes for a user's profile into the OIDC JSON Web Token (JWT). Hence, you access both profile attributes in the JWT returned to your OIDC client without making another call to the UserInfo endpoint.
See our post about how to Add custom fields to a JWT Access Token to learn more.
Update User Profiles
Guide on the different ways you can modify the profiles of the users of your application.
Authgear offers multiple ways for you (the admin) and your users to update user profiles. As an admin, you can modify profile attributes for any of the users of your Authgear project. End users on the other hand can modify their own profile using the Profile settings UI provided by Authgear or using a custom logic you implement in your code.
In this guide, we'll walk through all the options for updating user profiles.
Pre-requisites
To follow along, you need to have the following:
An Authgear Account. You can create one for free here.
At least one registered user on your Authgear Project.
What you'll learn
At the end of this post you'll be able to do the following:
Update a user profile as an admin from the Authgear Portal or using Admin API.
Update a user profile as an end user via the profile settings page.
1.0 Update User Profiles as an Admin
You can update the profiles for your users as an admin using either the Authgear Portal or the Admin API. Below are guides on how to use both options.
1.1 How to Update User Profile from the Authgear Portal
This option provides an easier way to manage your users within the Authgear Portal.
To update user profiles using this method, first, log in to the Authgear Portal, then select your project.
Next, Navigate to User Management section to view all the users currently registered under your project.

Click on the ID (name, email, or phone number) for the user you wish to update their profile to open the edit user details page.

From the edit user details page, you can edit the selected user's standard attributes such as Given Name, Family Name, Birthday, etc. If you scroll down on the edit user details page, you'll find more fields like the custom attributes that you can also update.
Once you're done, click the Save button to keep your update.
1.2 Using Admin API to Update User Profiles
The second option available for updating user profiles is the Admin API. The Admin API is a GraphQL API that you can use to manage your users. You can access Admin API from the API Explorer or by making requests to the API from your code or a client like Postman.
To update a user profile via the Admin API, you need to create a mutation like the following:
First, create a variable with all the existing profile attributes for the user, then include new fields or update the value for the fields you wish to update. Note that omitting an existing attribute in your variable will cause Authgear to delete that attribute.
Variable
Mutation
For a detailed guide on making a GraphQL query to update user profiles, see our dedicated post on updating user's standard attributes using Admin API.
Also, see the Admin API example for updating custom attributes to learn how to update custom attributes of a user profile.
2 How End Users Can Update Their Own Profile
Authgear provides a user settings page in addition to the default Auth UI for user registration and login.
Your users can update their profile from this settings page by following the steps below:
First, within your application, provide a link to the user settings page for your Authgear project. The URL should look like this: https://<YOUR_AUTHGEAR_ENDPOINT>/settings. Note that users can not access this link directly without logging in first.
After a user logs in and visits the settings page, they can view their profile photo and other details. To access the edit profile page, the user should click on the More link under the My profile card.

On the edit profile page, the user can set their profile photo and update other details for their profile.

To edit an attribute, the user should click on the edit icon beside that attribute.

Profile Custom Attributes
Learn how to add custom attributes to user profiles and manage existing custom attributes
In Authgear, a user's profile includes two types of attributes.
The first is the standard attributes which are basically common profile fields such as Primary Email, Primary Phone, Username, Name, Birthday, etc that are present by default.
The second type is the custom attributes an Authgear user can set for their project. This allows you to add custom fields to the profiles of your users. For example, you can add a Post Code custom attribute to your Authgear so users can provide this data for their profile.
All custom attributes are returned in the UserInfo response under the custom_attributes field.
In this post, you'll learn how to add new custom attributes to your Authgear project. You'll also learn how to manage existing custom attributes.
1. How to Add a New Custom Attribute
You can add new custom attributes to your project from the Authgear Portal. To do this, first, navigate to User Profile > Custom Attributes. Then, click on the Add New Attribute button to open the Add Custom Attribute page.

Enter the Attribute Name, a valid attribute name should consist of lowercase letters (a-z), digits (0-9), and underscore () only, must start with lowercase letters (a-z), and NOT end with an underscore (_).
Select the appropriate Attribute Type based on the type of data you expect users to enter in the custom attribute. The option you select will affect the type of input field (text field, dropdown, etc) users will see in their profile settings UI.

Once you're done, click the Save button to add the new custom attribute.
2. Set Who Can Access a Custom Attribute
Usually, the next key action to take after adding a new custom attribute will be to set the access right. An attribute's Access Right is a configuration that determines who can see (Read-only) or add or modify (Editable) the value of an attribute's field.
You can set the Access Right for an attribute under the following groups:
Portal Admin: Access control for the user profile attributes in Admin Portal > User Management.
Token Bearer: Access control for the user profile attributes in the UserInfo endpoint.
End-user: Access control for the user profile attributes in the End-user settings page.
To set the access right for an attribute, navigate to User Profile > Custom Attributes in the Authgear Portal. On the Custom Attributes list, click the Access Right dropdown for the group and custom attribute you wish to update. Click Save when you're done to keep the changes.

Note: Selecting the Hidden access right, for any group will hide the field for the attribute from that group. For example, selecting Hidden for the post_code attribute for the Token Bearer group means the post_code field will be hidden (not included) in the UserInfo endpoint response.
3. Modify Custom Attribute Name
From the Custom Attributes list, click on the pencil icon to open the Edit Custom Attribute page.
Note: You can't modify the Attribute Type for an existing attribute. The alternative will be to create a new custom attribute with the new Type and migrate data from the old attribute to it. Also, rename and change the access right for the old attribute to make it obsolete.

4. Reorder Custom Attribute Position
You can set the order of how custom attributes appear in the UI.
To do that, in the Custom Attributes list, click and drag the stacked icon next to an attribute up or down to move the position.

5. Delete Custom Attribute
Delete is not supported. Instead, you should change the name and access right to make the attribute obsolete.
Update user profile on sign-up using Hooks
Learn how to update a User profile's custom attributes on sign-up using Hooks
Using Hooks you can put extra information into the user profile's custom attributes programmatically. This is useful for Profile Enrichment where making your current customer data better by adding more details from outside sources.
Here are easy steps to achieve this:
Step 1. Make sure that you have an Authgear account. If you don't have one, you can create it for free on the Authgear website. Start by logging into your Authgear dashboard.
Step 2. Go to User Profile → Custom Attributes page.
Step 3. Add 3 new attributes there, namely city, name, and timezone:
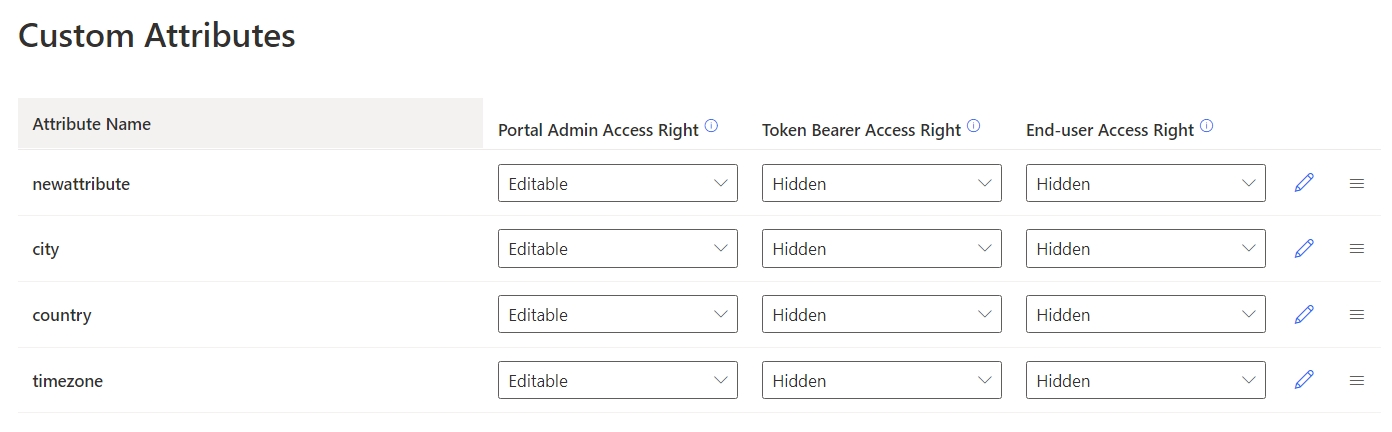
Step 4. Navigate to your Authgear Dashboard's Advanced->Hooks section.
Step 5. Add a new Blocking Event.
Step 6. Choose the Block Hook Type as the TypeScript and set the Event option to User pre-create. You will write a new Typescript function from scratch.
Step 7. Click on Edit Script under the Config option.
Step 8. Write a function logic for how you integrate any external API to populate custom attributes into the editor. For example.
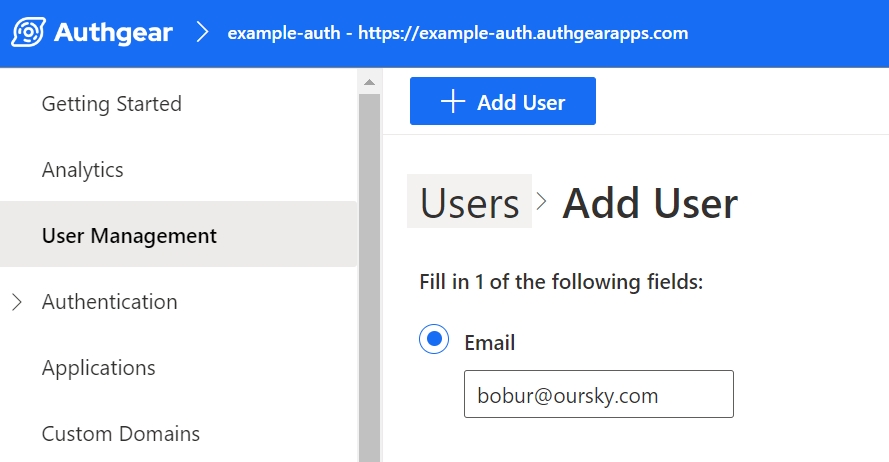
Step 9. Now if you navigate to User Management and Add a new user.
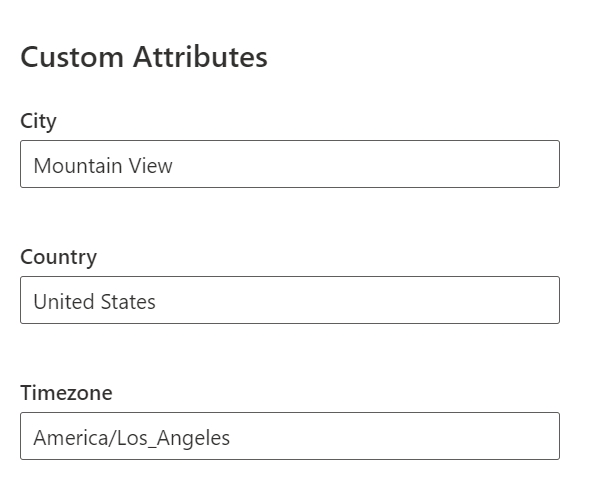
Step 10. After the user is created, you should able to see custom attributes values have been updated for the user:
Next steps
Once you learned how to update user profiles, now you can discover different ways of accessing user profiles in Authgear.